How to Rebuild an OST File in Outlook 2021, 2019, 2016, 2013, 2010?

In order to rebuild a new OST file, you must delete and then recreate the OST file to ensure that communication activity continues if the OST file is corrupted for known or unknown reasons. You can create or restore OST files to access lost data. Instructions for creating a new OST file in each version of Outlook are available here.
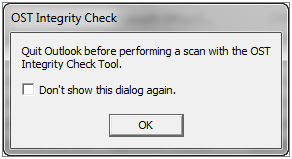
In older versions of Outlook, Scanost.exe was used to repair OST file in Outlook 2007 and lower versions.
Expert Solution to Fix OST File Corruption Error in Outlook
In earlier versions of Microsoft Outlook application, ScanOST.exe is available to check the inconsistencies and error among OST files but it is only recommended for lower level corruption. In the recent versions, this utility is not available and scanning OST files using ScanPST.exe takes longer than expected. Therefore, the Offline Storage Tables can be recovered by using extraneous Exchange OST Recovery Tool that helps recuperating all healthy data presented in the OST and export to a healthy Outlook data file.
Step by Step Process to Operate this Software
How to Delete an OST File in Outlook?
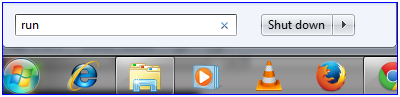
Follow the step by step guide to delete and OST file in Outlook:
- Exit Outlook application
- Go to ‘Start’ menu and then select ‘Run‘
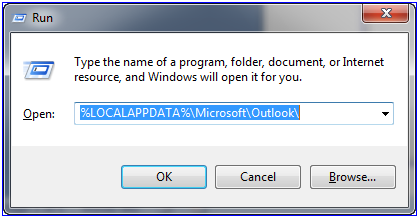
- The ‘Run’ box will appear, in the ‘Open’ text box type:
“%LOCALAPPDATA%\Microsoft\Outlook\”
- Explorer window will appear with the list of Outlook files. Locate the OST file that needs to be deleted
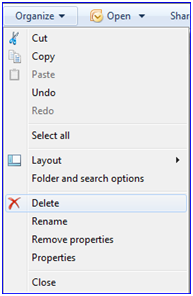
- Delete the file by following either of the given alternatives:
- Click on the file and then press the ‘Delete’ button from the keyboard
- Select the file and select ‘Delete’ option available within ‘Organize’ option in Windows Explorer.
How to Re-create OST File in Outlook?
The next section describes the detailed procedure for creating a new OST file for different versions of Microsoft Outlook. Here are the steps for creating a new OST file one by one for each version of Outlook. Click a specific link to be redirected to the required steps.
- How to Recreate OST File in Outlook 2007
- Steps to Recreate OST File in Outlook 2010 & 2013
- Process to Create OST File in Outlook 2003 & 2002
How to Recreate OST File in Outlook 2007?
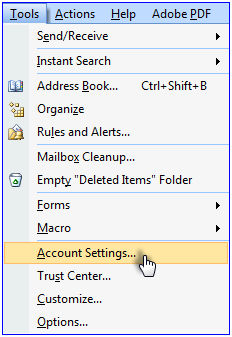
- In the MS Outlook application, open ‘Tools’ menu

- In the options available under ‘Tool’ menu, go to ‘Account Settings’
- In the Account Settings window double-click on ‘Microsoft Exchange’>
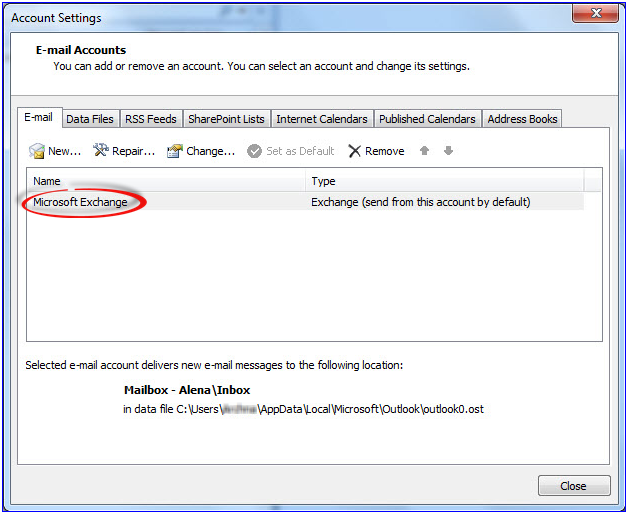
- ‘Change E-mail Account’ window will appear, click on ‘More Settings’ button

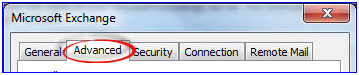
- In the then appeared window, click on the ‘Advanced’ tab
- Click on ‘Offline Folder File Settings’ and then in ‘File’ box, type the accurate path of the file that is required to set as OST file
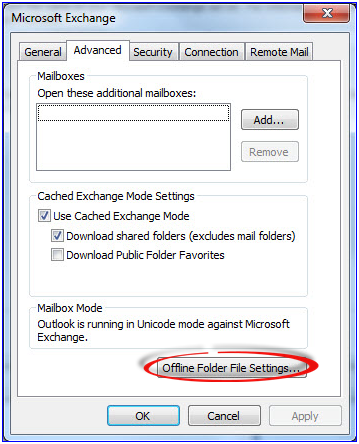
- Then click on the ‘OK’ button
- Default name for the OST file is set as ‘Outlook.ost’. If the file with same name already exists, you might prompt for renaming
- Click on the ‘OK’ button and then click ‘Finish’.
How to Recreate OST File in Outlook 2010 & Outlook 2013?
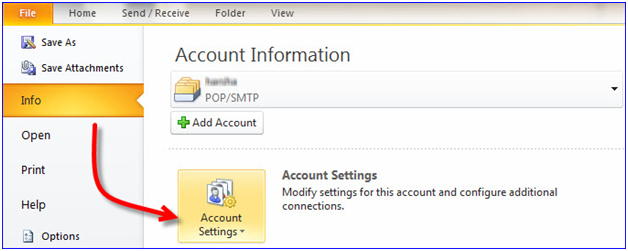
- In MS Outlook application click on the File tab available on ribbon
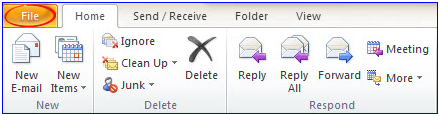
- Then select ‘Info’ and click on ‘Account Settings’ option available in the right pane
- Further, Go to Step 3 and repeat it till Step 9 as mentioned for MS Outlook 2007.
How to Create An OST File in Outlook 2003 & Outlook 2002
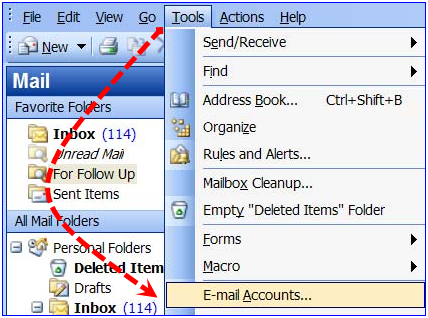
- From main menu bar, select ‘Tools’ and then click on the ‘E-mail Accounts’
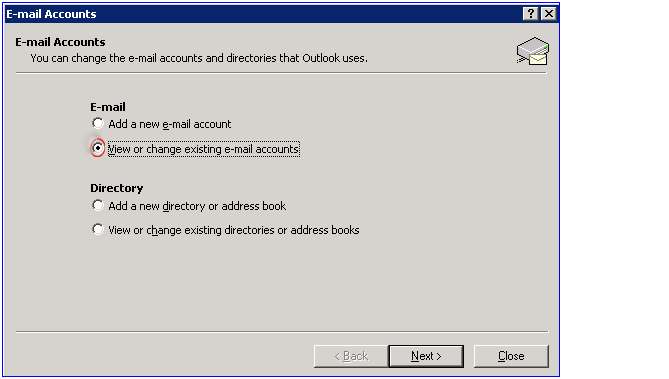
- Select ‘View or change existing mail accounts’ and then click on the ‘Next’ button
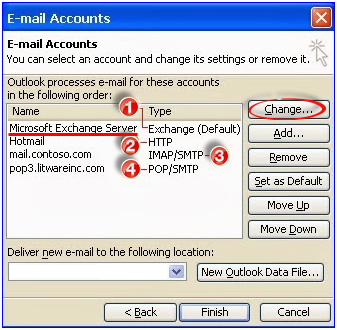
- Next, click on ‘Microsoft Exchange Server’ in the box associated to ‘Outlook processes email for these accounts in the following order’ and next click on the ‘Change’ button
- Further, click on ‘More Settings’ box and then select ‘Advanced‘ tab
- Select ‘Offline Folder File Settings’
- Afterwards, type the source path of the desired file that needs to be set as OST in ‘File’ box. Default name of the file will be ‘Outlook.ost’ and this requires to be reset as per requirement
- Click on the ‘OK’ button; click on ‘Next’ and finally click on ‘Finish’.
How to Restore OST File in Outlook 2019, 2016, 2013?
After creating a new OST file with different versions of Microsoft Outlook, you need to check the sync status between Outlook and Exchange through the OST Consistency Checker.
In a recent update from Microsoft, it recommends that for restoring OST, delete the file and then re-download it from Server.
In case, if the OST is not synched with Server and contains local data, then it is suggested to backup OST file and then delete the existing OST file. Later use backup file in Outlook. If any duplicate data exists, it can be excluded from the file during export.
Following procedure can be implemented to backup OST file:
How to Restore OST File in Outlook 2013 & Outlook 2010
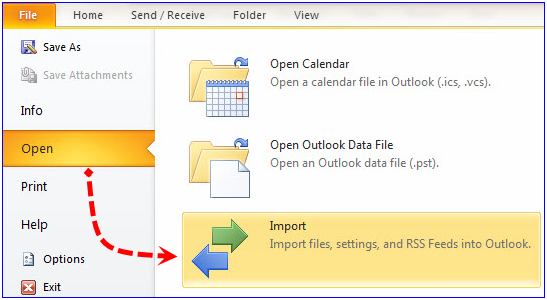
- Go to ‘File’ tab, click on ‘Open’ and then select on ‘Import’
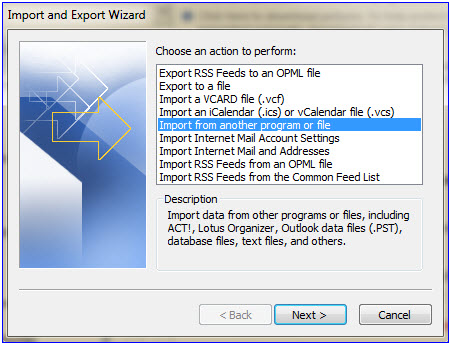
- In the then appeared window, click on ‘Import from another program or file’ and click ‘Next’
- Select the option ‘Outlook Data File (.pst)’, and then select ‘Next’

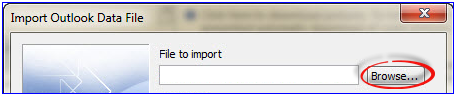
- Click on the ‘Browse’ button and locate the file
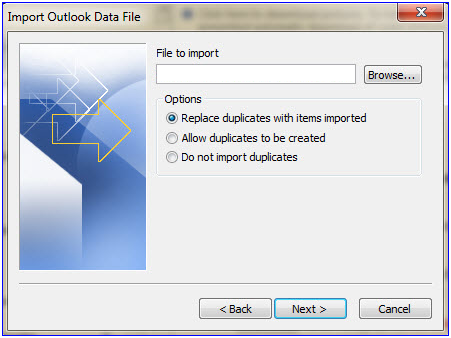
- Select an appropriate option among the given alternatives and select ‘Next’
- Select the destination folder to store the file and click ‘Next’
- Next, click on ‘Finish’
ScanPST.exe can still be used to check the logical as well as physical inconsistencies among OST files. But the Outlook Inbox Repair Tool might take longer for scanning the Offline Storage folders.
Note: It is highly recommended to backup OST files before executing any of the given procedures.
How to Restore OST File in Outlook 2007?
- Exit Outlook and Open SCANOST by following the given path:
“C:\Program Files\Microsoft Office\Office12”
- Here, if Outlook application is opened, it will prompt to close it for proceeding further:
- In ‘Profile Name’ select the appropriate profile within which the OST exists
- If it prompts and ask you to ‘Work Offline’; or ‘Connect’, select ‘Connect’
- Select the appropriate options and then click on ‘Begin Scan’.